Developer Center
The Basics
Vendor plugins for Saber have unlimited potential to expand the capabilities of a modern, secure content management system & website builder. When you decide to build a plugin for Saber, make sure to follow the development guidelines and create a modern experience for your users.
These small tutorials below should get you up to speed with many of the development processes used to build various types of functionality for a Saber plugin.
Create A Tab
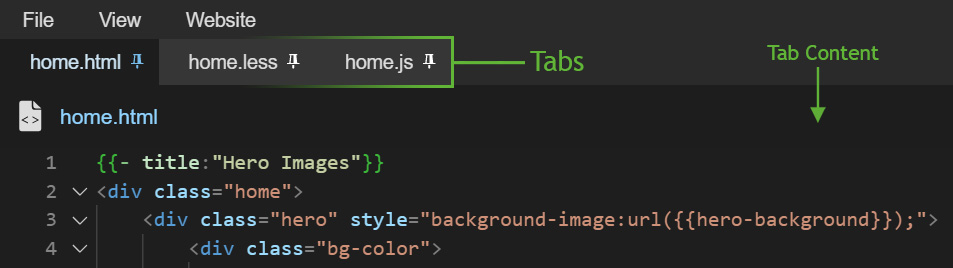
If you plan on displaying content within Saber, you'll first want to create a tab. When the user clicks on the tab, it will display your content, and when the user clicks on a different tab, your content will hide to show the content associated with the other tab.
The example above creates a new sub-menu item under the top menu labeled "Website", which will execute the function used to show the vendor plugin tab when clicked. If a tab with the specified ID my-tab-id already exists, Saber will not create a new tab.
Display Content
After creating a tab for your vendor plugin, you'll want to generate a div tag to add your content to. The tab system will automatically show & hide your content when your tab is focused & blurred, but you must include a class name that matches your tab's ID and include the tab class name in your div, then append the div to the .sections selector. Also, you'll want to make sure the div doesn't already exist, since this code will be executed any time the user clicks your menu item or button that generates your tab & content.
Next, you'll need to execute an API call in JavaScript to retrieve your content from the server. You may want to check if the content already exists in your tab before executing the API call.
On the server-side, you'll need an IVendorService that the AJAX request can access, and you may need to include security measures to protect the API from anonymous requests.
Finally, when the user clicks on your plugin menu item, a tab will appear and load the content that the user requested!
Update File Toolbar
When the user clicks on the tab associated with your vendor plugin content, you may want to update the file toolbar to display a custom title and action buttons.

This can be achieved by updating the file toolbar on your tab's onfocus event since the contents of the file toolbar is reset every time a tab is selected.
The area reserved for action buttons can also contain a search filter form or drop down menus as well.
Adding Items To Drop Down Menus
The top menu in Saber's UI comes with three items, File, View, and Website. If you'd like to add items to their drop down menus, take note that the File menu is reserved for file or web page operations, the View menu is reserved for displaying tools (that open in side bars or tabs), and you should add a menu item to the bottom of the Website menu if your plugin utilizes the IVendorWebsiteSettings interface.
The above example adds a menu to the Website drop down menu that will open the Website Settings tab and scroll down to the section related to that plugin.
You can also add your own top menu items if you need a drop down menu of your own. Saber does not support hierarchal drop down menu systems because we believe that the best user experience prevents the user from navigating through a maze of drop down menus, so you'll be limited to creating menu bars like the top menu within your interfaces.
You can add drop down menus to other HTML elements such as buttons.
In the example above, we generate out button & drop down menu container in HTML, and in JavaScript, we added three items to the drop down menu and registered an event listeners that displays the drop down menu when the user clicks the button.
For the drop down menu system to work, you must define a container element (e.g. <div class="app-menu">), and define a div with the class name drop-menu and a ul element as the child element of the div.
If you'd like to, you can write HTML to build your menus instead of using the JavaScript S.editor.dropmenu.add function. Below is an example of a menu system that would be added inside of your dropdown menu container (e.g. <div class="drop-menu">), or within a side bar or any other part of the UI.
Note that the first menu item in the example above is disabled and cannot be clicked.
Using Sql Server
Some more advanced vendor plugins might want to utilize the database, create tables & stored procedures, and retrieve data using an ORM. Saber includes a built-in system that will execute an Install Script when the user first installs your plugin, Migration Scripts if the user is updating an existing plugin, and Uninstall Script when the user decided to uninstall your plugin. Saber uses Dapper as an ORM and uses a helper class for handling Sql queries that use System.Data.SqlClient & Dapper and allows developers to execute Sql stored procedures in just one line of C# code.
There are several guidelines when developing database objects and using the helper class & C# Query models in Saber, so please read and understand all of the documentation before diving in.
The above example executes a stored procedure that sends all the public properties of product as Sql parameters and doesn't return any results.
The above example executes a stored procedure that sends productId as an Sql parameter and returns a single int value.
The above example executes a stored procedure that returns a list of objects.